These days there is a certain importance and trend both on social media and other media channels to announce an upcoming event upfront, promote it very strongly, and even make it a premiere on Facebook. There are many tools you can choose to help you make a specific event or any type of important timing more interesting. One of the ways is to use a coming soon page with a countdown. Therefore, today I wanted to share with you a quick and easy way to building a countdown landing page with a simple email sign up form that will be super easy to make with this step-by-step tutorial.
To complete this demo I will be using a jQuery plugin called Flipclockjs.com to power the countdown clock and MailChimp to power the email sign up form. If you enjoy coding and would love to learn more, you can also check out our article about Incredibly Easy Way To Get Your Social Twitter Followers Count Using PHP on Design Woop.
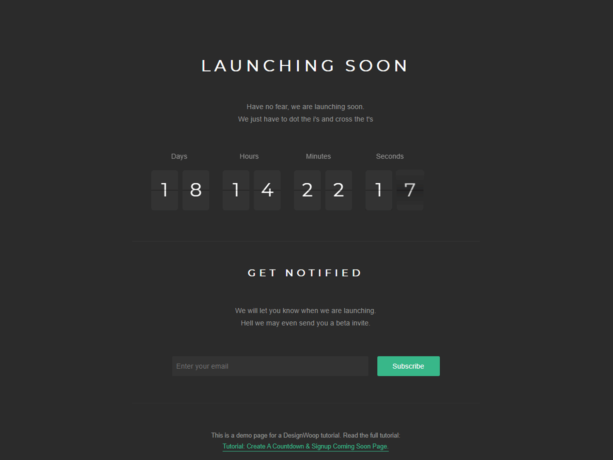
View The Demo or Download Source Code.
Table of Contents
End Result
Why Use Flipclockjs.com
Flipclockjs.com provides you with a highly customisable foundation on which you can base your clock, eliminating the need for complex rewriting of code. You can use the plugin as a clock, timer or countdown like the demo and theme it with pure CSS.
Getting Started
First we want to create a simple HTML file, this will call in the required jQuery files and CSS file. Below you can see I pull in the jQuery library, the minified Flipclockjs.com file and a scripts.js file. The scripts.js file contains the options for the actual countdown clock, I also make use of the Google font library and pull in a couple of nice fonts for the demo.
<!doctype html>
<html lang="en">
<head>
	<meta charset="utf-8">
	<title>Demo: Create A Countdown & Signup Coming Soon Page</title>
	<meta name="description" content="A demo page for the designwoop tutorial: Create A Countdown & Signup Coming Soon Page">
	<meta name="author" content="DesignWoop - David Martin">
	<!-- Load JS -->
	<script src="https://ajax.googleapis.com/ajax/libs/jquery/1.10.2/jquery.min.js"></script>
	<script src="js/FlipClock.min.js"></script>
	<script src="js/scripts.js"></script>
	<!-- Load CSS -->
	<link href="https://fonts.googleapis.com/css?family=Roboto:Roboto:400,500|Montserrat" rel="stylesheet" type="text/css">
	<link rel="stylesheet" href="css/style.css">
	<link rel="stylesheet" href="css/FlipClock.css">
	<!--[if lt IE 9]>
	<script src="https://html5shiv.googlecode.com/svn/trunk/html5.js"></script>
	<![endif]-->
 </head>
<body>
</body>
</html>
Creating The Content
Once our above raw html template is setup, we can add the content.
Below, you will see I have added the basic text content and classes that are ready to be themed using CSS. The div with the class dw_clock is referenced in our scripts.js file and this is where the clock will be loaded. You will also see I have included a ‘naked’ version of the Mailchimp html form, this will also be themed in our CSS file.
<!doctype html>
<html lang="en">
<head>
	<meta charset="utf-8">
	<title>Demo: Create A Countdown & Signup Coming Soon Page</title>
	<meta name="description" content="">
	<meta name="author" content="">
	<!-- Load JS -->
	<script src="https://ajax.googleapis.com/ajax/libs/jquery/1.10.2/jquery.min.js"></script>
	<script src="js/FlipClock.min.js"></script>
	<script src="js/scripts.js"></script>
	<!-- Load CSS -->
	<link href="https://fonts.googleapis.com/css?family=Roboto:Roboto:400,500|Montserrat" rel="stylesheet" type="text/css">
	<link rel="stylesheet" href="css/style.css">
	<link rel="stylesheet" href="css/FlipClock.css">
	<!--[if lt IE 9]>
	<script src="https://html5shiv.googlecode.com/svn/trunk/html5.js"></script>
	<![endif]-->
 </head>
<body>
<section id="dw_wrapper" class="clearfix">
	<section id="dw_countdown" class="clearfix">
		<h1 class="dw_launch_header">Launching Soon</h1>
		<p>Have no fear, we are launching soon.<br>We just have to dot the i's and cross the t's</p>
		<div class="dw_clock"></div>
		<hr>
		<h2 class="dw_launch_subheader">Get Notified</h2>
		<p class="dw_launch_subtext">We will let you know when we are launching.<br>Hell we may even send you a beta invite.</p>
		<section id="dw_mailchimp_form">
			<div id="mc_embed_signup" class="clearfix">
			<form action="https://designwoop.us4.list-manage.com/subscribe/post?u=b14cb5a32fad5c5fd5131db83&id=9cc9b4aa0d" method="post" id="mc-embedded-subscribe-form" name="mc-embedded-subscribe-form" class="validate" target="_blank" novalidate>
			<div class="mc-field-group">
				<input type="email" value="" name="EMAIL" class="required email" id="mce-EMAIL" placeholder="Enter your email">
				<!-- real people should not fill this in and expect good things - do not remove this or risk form bot signups-->
				<div style="position: absolute; left: -5000px;"><input type="text" name="b_b14cb5a32fad5c5fd5131db83_9cc9b4aa0d" value=""></div>
				<div class=""><input type="submit" value="Subscribe" name="subscribe" id="mc-embedded-subscribe" class="button"></div>
			</div>
			<div id="mce-responses" class="clear">
				<div class="response" id="mce-error-response" style="display:none"></div>
				<div class="response" id="mce-success-response" style="display:none"></div>
			</div>
			</form>
			</div>
		</section>
		<section id="dw_tut_credits">
			<hr>
			<p>This is a demo page for a DesignWoop tutorial. Read the full tutorial: <a href="#" title="">Tutorial: Create A Countdown & Signup Coming Soon Page.</a></p>
		</section>
	</section>
</section>
</body>
</html>
CSS Theming
At this point, our HTML is in dire need of some visual improvements. I have loaded in the separate CSS file into the header, in the style.CSS file I will add the below:
Note: Contained within the style.css file are basic HTML resets, these are now shown herein an attempt to keep the length to a minimum.
The below CSS creates the page design, typography style, and also themes the Mailchimp code.
At this point we have a page that is themed, but as of yet does not contain the working clock. For this we need to open our scripts.js file and initiate the clock an its options.
/*-- Theming --*/
#dw_wrapper {
	width: 100%;
	height: auto;
	max-width: 940px;
	margin: 0 auto 0 auto;
}
#dw_countdown {
	position: relative;
	max-width: 780px;
	margin: 25% auto;
	text-align: center;
}
h1, h2 {
	font-family: 'Montserrat', sans-serif;
	letter-spacing: 8px;
	text-transform: uppercase;
	color: #fff;
}
.dw_launch_header {
	font-size: 36px;
	font-size: 3.6rem;
	line-height: 1;
	margin: 0 0 60px 0;
	margin: 0 0 6.0rem 0;
}
.dw_launch_subheader {
	font-size: 22px;
	font-size: 2.2rem;
	line-height: 2.2rem;
	margin: 0 0 60px 0;
	margin: 0 0 6.0rem 0;
}
.dw_launch_subtext {
	margin: 0 0 60px 0;
	margin: 0 0 6.0rem 0;
}
#dw_tut_credits {
	font-size: 14px;
	font-size: 1.4rem;
}
hr {
	width: 100%;
	margin: 60px auto;
	height: 1px;
	background: #333;
	border: none;
}
p > a {
	color: #38b789;
	text-decoration: none;
	padding-bottom: 2px;
	border-bottom: 1px solid #38b789;
	-webkit-transition: all 0.3s ease-in-out;
	-moz-transition: all 0.3s ease-in-out;
	-ms-transition: all 0.3s ease-in-out;
	-o-transition: all 0.3s ease-in-out;
	transition: all 0.3s ease-in-out;
}
p > a:hover {
	color: #34a87d;
	border-bottom: 1px solid #34a87d;
}
/*-- MailChimp Style --*/
#mc_embed_signup {
	max-width: 600px;
	margin: 0 auto;
}
input[type="email"] {
	display: block;
	width: 100%;
	height: 4.4rem;
	max-width: 440px;
	background: #333;
	float: left;
	border: none;
	outline: none;
	font-size: 1.6rem;
	font-family: inherit;
	font-weight: 400;
	color: inherit;
	line-height: 2.2rem;
	margin: 0 20px 0 0;
	padding: 0 10px;
	-webkit-border-radius: 3px;
	-moz-border-radius: 3px;
	border-radius: 3px;
	-webkit-transition: all 0.3s ease-in-out;
	-moz-transition: all 0.3s ease-in-out;
	-ms-transition: all 0.3s ease-in-out;
	-o-transition: all 0.3s ease-in-out;
	transition: all 0.3s ease-in-out;
	-webkit-font-smoothing: antialiased;
	-webkit-appearance: none;
}
input[type="email"]:focus {
	opacity: 0.9;
}
input[type="submit"] {
	display: block;
	width: 100%;
	height: 4.4rem;
	max-width: 140px;
	background: #38b789;
	border: none;
	outline: none;
	font-size: 1.6rem;
	font-family: inherit;
	font-weight: 400;
	color: #fff;
	line-height: 2.2;
	padding: 0 10px;
	-webkit-border-radius: 3px;
	-moz-border-radius: 3px;
	border-radius: 3px;
	-webkit-transition: all 0.3s ease-in-out;
	-moz-transition: all 0.3s ease-in-out;
	-ms-transition: all 0.3s ease-in-out;
	-o-transition: all 0.3s ease-in-out;
	transition: all 0.3s ease-in-out;
	-webkit-font-smoothing: antialiased;
	-webkit-appearance: none;
}
input[type="submit"]:hover {
	cursor: pointer;
	background: #34a87d;
}
Flipclockjs.com Setup
The Flipclockjs.com functionality is really the heart of this coming soon landing page, we have already included jQuery and the minified Flipclockjs.com minified jQuery file. Next we need to initiate our clock and set any options we wish to use.
The purpose of this clock is to countdown to a set date in the future, aka our launch date. Below, as annotated in the comments we grab the current date, set our future date (for the demo purposes) then find the difference. There is a whole load of additional options and methods you can pass into the clock.
In the scripts.js file I use the below code:
var clock;
$(document).ready(function() {
	// Grab the current date
	var currentDate = new Date();
	// Set some date in the future. In this case, it's always Jan 1
	var futureDate  = new Date(currentDate.getFullYear() + 1, 0, 1);
	// Calculate the difference in seconds between the future and current date
	var diff = futureDate.getTime() / 1000 - currentDate.getTime() / 1000;
	// Instantiate a coutdown FlipClock
	clock = $('.dw_clock').FlipClock(diff, {
		clockFace: 'DailyCounter',
		countdown: true,
		showSeconds: true
	});
});
Flipclockjs.com Themeing
Flipclockjs.com also comes with a deafult theme, I have included this as a separate stylesheet for the purposes of the tutorial. You can theme the entire clock with pure CSS should you wish.
Conclusion, Demo & Download
It is a very simple, effective html template – useful for future product launches. It really does not require an excessive break down and commentary as it fairly self explanatory basic HTML/CSS and jQuery. There are loads of other options and uses for the clock itself, for this tutorial we have only really scratched the surface of what is possible with the Flipclockjs.com plugin.