When working in Xcode there are many different views you can attach into your iPhone App. Most of them work within Objective-C libraries, but the UIWebView class is particularly different. This gives you have the ability to render a full HTML webpage inside your iOS app. This can provide a solution for developers who are not yet familiar with programming in Objective-C.
In this tutorial I’d like to go over the basics of setting up a web view for an iPhone application. We can include a small demo webpage inside the webview to see how rendering works. Additionally I’ll provide my project source code so you can download a copy and work with this application on your own.
Table of Contents
Creating the New Application
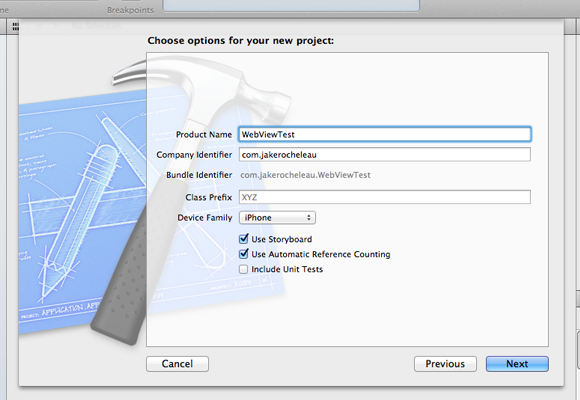
Let’s get started by opening Xcode and creating a new project. You can select this from the splash page or go to File -> New -> New Project... We want a single-view application which I’m going to name WebViewTest.

The class prefix shouldn’t matter, make sure the device family is selecting iPhone. Also ensure that Storyboard and ARC(Automatic Reference Counting) are checked. You’ll be asked to choose a save location for the project files, and afterwards we are directed into the Xcode project area.
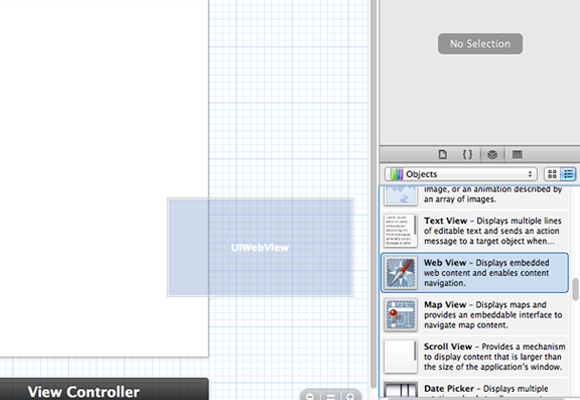
Now from the files navigator pane click on MainStoryboard.storyboard to open up the user interface display. Xcode allows for drag-and-drop placement of objects and for this tutorial we want to follow the simplest path to get our application working.
In the right sidebar you’ll find the objects library. If this is too small you can click the top bar and drag upwards to increase space. If you scroll through you’ll eventually find something labeled “Web View” with a safari icon. Click and drag this onto your storyboard and align it into the center.
Connecting to .h/.m Files
Objective-C uses a series of Header(.h) and Implementation(.m) files to create application views. The header file often includes other external resources, along with defining important methods and instance variables.
To make this connection a bit easier we can drag from the scene controller right into the ViewController.h, and have all our object setter/getter methods calculated automatically. Setup your view with only the Assistant Navigator selected along with the left navigation pane.

Now hold down the control key and click+drag from the Web View scene controller all the way into our ViewController.h right beneath the @interface call. If you can’t see the Scene Controller just click the small arrow in the bottom left corner next to the navigator pane.
You know the connection will work if you see the phrase “Insert Outlet or Outlet Connection”. Release the mouse and a small popup window will appear. I’ll use the name customWebView which will be the reference name for our IBOutlet(Interface Builder Outlet). Click the Connect button and the selection will flash briefly, letting you know the code has been added properly.

About the Outlet Connection
What we just did was create an instance variable in Objective-C code which connects to the UIWebView inside the Storyboard file. This is sort of like creating an instance variable of one UIWebView which is then linked to our object on the screen.
The only other code added was inside ViewController.m which uses @synthesize to create setter and getter methods. These can be fairly confusing if you are not familiar with programming ideologies. But this helpful Stack question goes into some detail about @synthesize and why we are using it.
And so with our variables setup we can finally add an interesting block of code. We want to create a few variables relating to a URL that we want to load into the web view. This is all setup inside ViewController.m inside the viewDidLoad method.
Loading an External Webpage
For just getting started let’s add some important variables into our initial loading function. Everything inside viewDidLoad will initiate as soon as the app is run. I have copied over my full code for this method below:
- (void)viewDidLoad
{
    [super viewDidLoad];
    NSString *httpSource = @"https://www.bestseocompanies.com/";
    NSURL *fullUrl = [NSURL URLWithString:httpSource];
    NSURLRequest *httpRequest = [NSURLRequest requestWithURL:fullUrl];
    [customWebView loadRequest:httpRequest];
}
Objective-C requires variable type casting so we need to setup each of these defaults. First we’re creating a string value which holds the URL to DesignWoop. The NSURL type will hold a hyperlink value when passed with a string. Then we can take that hyperlink URL and convert it to a URL Request. This new variable requires a URL parameter and will create a request to load that external website.
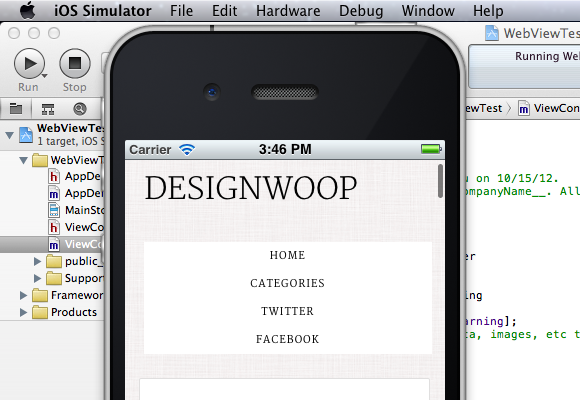
Finally the last line is using loadRequest which is a method of the UIWebView object. All UIWebView instances will be able to call this method and you can pass any URL value that you’d like. To build & run the application make sure all your files are saved and click the big play button in the top left corner, or use the keyboard shortcut CMD+R.
How to Use Local HTML Files
This last bit of code is useful for people who want to create mobile iPhone apps using their own HTML files. You can build game guides, mini websites, tutorials, photo galleries, and other cool applications all with UIWebView and some navigation tools.
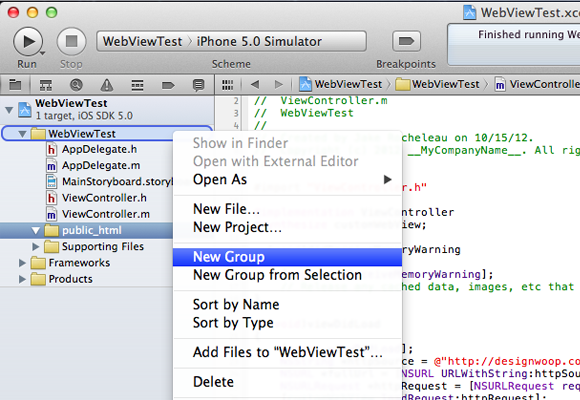
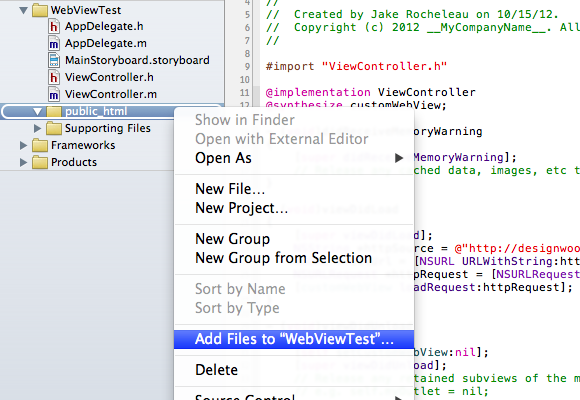
First create a simple HTML page and throw some dummy text into the body. My file is named uiwebview.html but you can name this anything. Now back inside Xcode Navigator and find your project folder which contains the storyboard and all the .h/.m files (mine is labeled WebViewTest). Right-click this folder and select “New Group” – I have created a new folder named public_html which is where I’ll store any important web files.
If you right-click on public_html one of the options should read “Add Files To”. Select this and a new file browser window will appear. Locate your HTML file and make sure you have the Destination check box active. This will copy all your selected web files into the Xcode project folder so you can port these between computers.
Inside Xcode select ViewController.m and comment out the previous lines of code except for [super viewDidLoad]; We will be replacing this with a series of methods which can load raw HTML data and implement that directly into a UIWebView. I have copied over my new Objective-C code below:
NSString *htmlFile = [[NSBundle mainBundle] pathForResource:@"uiwebview" ofType:@"html"];
    NSString *htmlString = [NSString stringWithContentsOfFile:htmlFile encoding:NSUTF8StringEncoding error:nil];
    [customWebView loadHTMLString:htmlString baseURL:nil];
Now even though we’re keeping these files inside a group named public_html they are also physically located inside our main project folder. These files are almost always bundled together when you compile the application – therefore we don’t need to include a subdirectory. However there will be times when your HTML files are rooted deep inside directories and you may need to add the inDirectory parameter.
You should notice that pathForResource is the name of our file without the extension. And then ofType is the file extension but without any period. We pass this file location into stringWithContentsOfFile to create a long string of HTML data. Then instead of loadRequest on the UIWebView we are now using a loadHTMLString method. Much more efficient especially if you have CSS styles and images to include.
Wrapping Up
I hope this brief tutorial can give mobile developers insight towards working with iPhone applications. Objective-C is a very difficult language to dive into head-first, especially with little-to-no prior experience of programming languages. But if you have some knowledge of HTML5/CSS3 web development then you can build very nifty applications through UIWebView screens.
I have included a copy of my source code which you can download above. This was built using Xcode 4.2.1 with iOS5. But it should scale properly to other older versions of the software. If you have additional comments or questions about the tutorial feel free to share with us in the discussion area below.